DIY Projects for the Master-Bedroom
By Lucas on Sep 22, 2014
For this installment of our DIY series, the Newinhomes.com team researched different ways to spice up the decor in your master bedroom. That rustic-chic look is very popular, so we figured we would go that route and give you three easy (somewhat easy?) ways to improve the decor in your new home.
Your master bedroom is possibly the most important room in your home. It’s probably the least seen room by visitors and other members of your family, but that’s why it is crucial for this space to be truly your own. Who cares if no one else sees it? This space is yours, and here are three ways to make it even better:
Suitcase nightstand
 Via bybmedia.com
Do you have a super boring, ultra-plain nightstand? Let us guess, it’s brown and has four legs, maybe a drawer or storage space underneath? The nightstand may seem like an insignificant piece of furniture because of its size and the fact that it is hidden away next to your bed, but really, it’s one of the most important furniture pieces in your home!
The nightstand holds your light to read, it’s where you put your phone at night when you go to sleep, it’s where your favourite book stays even when you’re reading a new one. If you’re the creative type, you probably keep a notepad next to the bed because you come up with all of your best ideas while trying to sleep. Don’t let this piece of furniture fly under the radar. Make it stand out!
One awesome way to make your nightstand a more prominent piece in your master bedroom is to accent it with an old suitcase. There are two easy and fun ways of doing this. The first way is to purchase an old suitcase from an antique market, like the big one held every sunday at the St. Lawrence Market in Toronto. Find a suitcase that you really like and then use a strong adhesive to attach it to a shorter nightstand. Voila - you have a suitcase nightstand. If you want to get even more creative, paint the suitcase before attaching it to the table. another upside of this design is that you can use the suitcase for extra storage.
 Via freshome.com
The second way to create a suitcase nightstand is to purchase numerous vintage suitcases and do away with the table all together. Just stack as many as it takes on top of each other to reach the appropriate height for your bed.
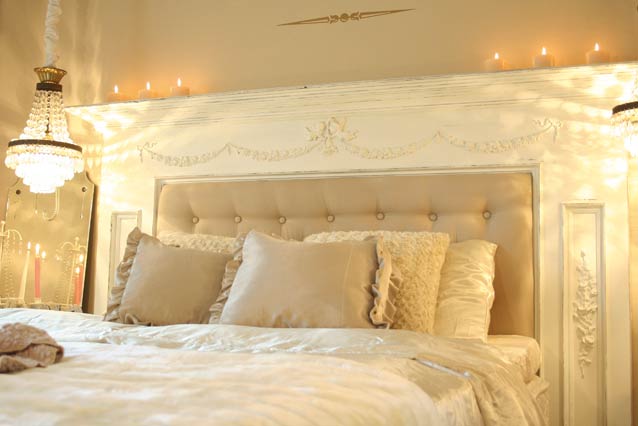
Fireplace headboard
 Via shelterness.com
Sounds dangerous doesn’t it? Don’t worry, you won’t be starting any fires in this fireplace - in fact - this DIY project only requires the mantel that would surround the fireplace. Go to any home hardware store and look for a mantel that catches your eye and make sure it’s fabricated out of a lightweight material. Now, instead of installing the mantel around a fireplace, install it behind your bed!
For this project, make sure your bed is set in the room in a place that you plan to keep it for a long time, because once that mantel is up, uninstalling it is another project all together, and if you rearrange your room and the bed changes spots, that mantel will look pretty silly. But, until then, you’ll probably have the coolest headboard.
Custom room divider
 Via dettydesign.cafeblog.hu
Room dividers are perfect for splitting up a space, so this is for those of you with a larger master bedroom. Room dividers can be purchased at any homewares store like HomeSense or IKEA, but why not make your own? After all, a room divider is only three panels attached by hinges.
For this DIY project, you may have to pay another visit to the antique market, because you will need three vintage doors. The room divider will look even more like a traditional one if you manage to find slimmer pantry doors. It’s okay if you find doors with windows because you can always frost them (assuming you are building the room divider for additional privacy).
You know how doors are attached to door frames with hinges? Same concept. Just use the hinges to connect all three doors! Remember, smaller doors work better for this project, but if you’re feeling ambitious and want a huge room divider, get whatever doors you want - as long as the heights are easily manageable for when you want to move the divider.
Don’t forget to share your DIY projects with us on Twitter and Facebook!


